

The examples in this post will be using Windows 8.1, but the technique is similar in Windows 7.
Step 1: Open Windows File Explorer
In Windows 8.1, Right click on the Windows Start Button to display the Start Menu: (Windows 7 simply click on the Start button) and select ‘File Explorer’

OR, use the keyboard shortcut: Windows Button + ‘E’.

Step 2: Customize View in Windows File Explorer

Use the Navigation Pane or the File Box to select the files to include in the search. In this example I will be searching through files from my Control-C Control-V BLOG folder:

I have closed the ‘Navigation Pane’ to simplify the screen for this post, but you can leave it open to help you locate the folders you want to search.
Step 3: Type text into the Windows File Search Box
In this example I am going to search for the word ‘Macro’ in my ‘BLOG’ folder, to find all the documents that I wrote about custom macros. Here are the results:

Notice that an excerpt containing the search phrase is displayed with every file on the list, with the word ‘Macro’ highlighted in yellow.
When I click on one of the search results, the document content appears in the preview pane:

You can scroll through the document in the Preview Pane and even copy content.
Unfortunately, the Preview Pane does NOT highlight the search text in the pane. However, you can double click on the item in the list to open the document in Word. Then you can use Word’s built-in search function to find all of the occurrences. The Search Results Screen stays active in the background so you can return to the list as needed.
Step 4: Set Search Options in Search Tools Tab
You may have noticed that when you click inside the Search Box the ‘Search Tools’ tab appears:

Here you can set options to narrow or broaden your search. There are many things you can do with this tab, including writing very complex and targeted queries using Window’s ‘Advanced Query Syntax.’ But in this post we will keep it simple and just look at the most common options you may want to use.
Setting ‘Date Modified’ Search option:
Click on the ‘Date Modified’ drop-down to narrow your search to recent documents.

Let’s search documents from last year. By selecting that option the text in the Search box changes to this:
Macro datemodified:last year
The search term ‘Macro’ appears first in gray, and the date modified parameter appears in blue followed by a colon.
Let’s say I just want to search the Blog files from last December. I can simply change ‘last year’ to December 2014:
Here are the results:

If you are not sure when the document was modified you skip this step. You can also sort the list by ‘Date Modified’ so you can view the most recent first.
Set the ‘Kind’ of file in Window’s Search Options
In our example we are searching for Word documents that I later made into Blog posts. Using the ‘Kind’ operator will find files with all document extensions (.doc, .docm, .dotm, etc.)

Here is how the search box looks now:
Set the ‘Size’ option in Window’s File Search:
I am looking for articles that will be posted in this Blog. Some of the documents are small and some are medium.
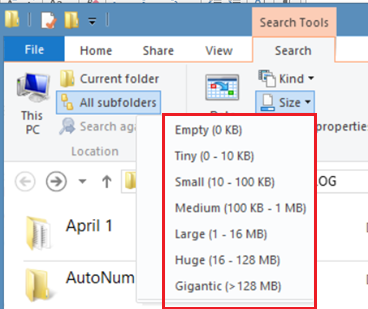
I will start by selecting ‘small’
and editing the text box:
Here are the results:

Summary of Steps to Search Proposal Documents:
- Open File Explorer (Windows Button + ‘E’)
- Click ‘View’ Tab:
- Open Navigation Pane and locate folder to search (Close Navigation Pane if desired)
- Select ‘Preview Pane’ to open document viewer
- Select ‘Content’ layout to show search text excerpts
- Enter text into ‘Search Box’
- Set options in ‘Search Tools‘ tab to narrow search if desired.

The 5 Best Proposal Software Solutions 2023
Crafting a compelling proposal that effectively showcases your company is no walk in the park. The process demands transparency, impeccable writing, and an aesthetically pleasing design to make a lasting impression on potential clients. However, in the fast-paced...

Is it Worth Responding to an RFP?
7 Factors to Help You Decide
When deciding whether to respond to a Request for Proposal (RFP), it's essential to evaluate its worth and potential value to your business. Here are some factors to consider when determining if an RFP response is warranted. Alignment with your Business Strategy...

Why Do Businesses Need RFP Response Software?
Businesses often use RFP (Request for Proposal) response software to streamline and automate the process of responding to RFPs. RFPs are a common way for companies to solicit proposals from vendors or service providers, particularly in the B2B space. If you are...

3 Benefits of Using Proposal Software
Although proposals are just one of the many elements of a buyer's journey and the sales cycle, they play a significant role in sales success and winning new business. How can you raise the level of professionalism and positively impact the number, quantity, and...

Complete Guide to RFP Software
A Request for Proposal (RFP) is a document issued by a business, non-profit, or government agency to outline the requirements for a specific project and secure offers from various vendors to bid on the project. Responding to an RFP manually, without the help of RFP...